The Secret To Recording Great Drum Tones
It isn’t about having some rare vintage microphone. It’s not using some killer mic pre. And it isn’t using some flashy EQ or compression trick.
It’s all about what happens before any of these things are patched up-taking the time to properly tune the drum kit.
I know… boring… you were expecting some underground super-trick.
Nevertheless you would be surprised how overlooked this fundamental prep-step is.
But you don’t overlook stuff. You’re a professional ;-)
Regardless, even if you are diligent about having the drums in tune, it never hurts to brush up on the know-how. You might pick up a new insight. So grab yourself a drum key and a set of sticks, and let’s dial in the tones.
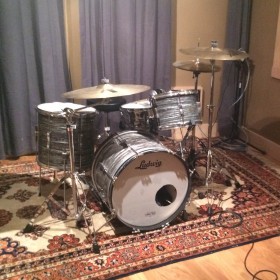
Tuning The Drums
Tuning drums is very much a subjective process. It all depends on what tone and sounds you’re looking to get out of the drums, which is typically dictated by the context and style of the song, along with some personal preference. The important thing to keep in mind is consistency. You want each drum to be even in tone, respective pitch, and behave predictably when struck in various places across the head.
For example, maybe you want your toms to be very resonant, and resonate down from one pitch to another as the sound decays. Perhaps you like your snare drum to ring at the tonic note of the song. Or it could be that you don’t like to hear very much “note” in the sound of your drums at all, but rather a more tight/dry/dead sound that emphasizes more of an initial “bunt strike” and percussive quality of the drum (as I do).
All of these things are achieved through tuning the drums in a way that makes them sound the way you want. Again, the important thing is to tune the drums so that the heads have the proper even tension (or they will sound flappy and “papery”), and that they resonate consistently and in proper relation to one another (toms step down from high tone to low tone, etc).
A good place to start is with the “standard tuning” that manufacturers typically use when they ship the drums.
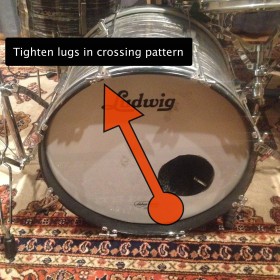
Kick drum:
Place the drum on a flat hard surface, such as a wood floor or table with the resonant head facing up toward the ceiling. If the head is new and has no tension, start working your way around the drum, tightening the lugs in a crossing pattern. Make sure to put some pressure on the head a few times with your hand, to help the head stretch and to make sure it’s seated correctly on the rim of the drum. Work out the wrinkles.
Once there’s some tension on the head, use a drumstick or your finger and tap around the edge at each lug noting any differences in pitch.
When you find a spot where there’s a tonal or pitch discrepancy, adjust the offending lug until it matches the pitch/tone of the rest of the drum.
After you have the resonant head of the bass drum dialed in, move to the beater side and tune it using the same approach.
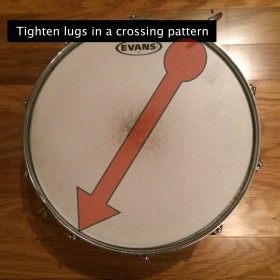
Toms:
For toms, the top head is what gives the drum it’s initial pitch and tone. The bottom head dictates the resonance of the drum, and what pitch the drum will “bend” to as the sound decays.
Begin working on the toms the same way you did with the kick drum-with the drum upside down so that the resonant head faces the ceiling. Work your way around each lug of the drum in a crossing pattern until the head has a good amount of tension on it, while also putting pressure on the head with your hand a few times. Then tap around the edge of the head where it meets the rim of the drum and fine tune any pitch discrepancies.
Work the top head the same way as the bottom/resonant head. Again, the bottom head is what determines the movement or bend of the note. So if you like there to be a distinct note that rings out in your drums, you will want to make sure these two heads are tuned in such a way that they work well together.
In other words, listen for the drum’s note to ring cleanly and distinctly, and then drop smoothly so that it decays to a note that doesn’t sound too dissonant. Take note that you may have to move back and forth between the top an bottom heads to get them sounding good together.
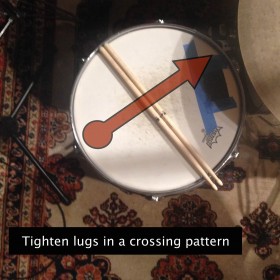
Snare:
For the snare, once more begin with the same approach as the kick and toms. Work your way around the edge of the head adjusting any lug that sounds harsh or in disagreement with the rest of the drum.
The snare is the part of the drum kit where the most personal preferences and subjectivity come into play. It’s the most present part of the kit that people end up paying the most attention to. This is why drummers often have several different snare drums with different tunings, different material, and and different dimensions on hand to swap out and change the sound around.
All this to say you can take a bit more liberty in your approach to tuning the snare. Just make sure you tune out any harshness.
Final general thoughts
As I mentioned before, tuning drums is a subjective practice that is mostly dictated by the style of music you’re recording, along with some personal preference. Some people like their drums to ring at distinct notes, others like to tune the kit so that the notes sound a bit more “blunted”, emphasizing the percussive qualities of the drums.
For those who like to hear a lot of resonance and notes ring out in their drums, a good starting point is to tune the snare to ring at a specific note, and then tune the toms down from the snare in thirds. The kick is usually so low that it’s often times a bit harder to pick out an audible note.
Don’t make the mistake of being uninformed on the topic of tuning drums just because you’re not a drummer. If you want the drums to sound the best they possibly can-whatever the circumstances-then you need to develop this skill so you’re fully informed when it comes recording a song you worked really hard on.
//Jon