The Secret To Super Punchy, Present, And Warm Recordings

One of the biggest contributing factors to a good or bad sounding recording comes down to something known as phase.
Get it dialed in and your drums will sound powerful and punchy, your guitars full and present, and your vocals smooth and warm.
Neglect it and your recordings will end up sounding wimpy. In some cases even hollowed out with a related issue, called the Comb Filter effect (more on this below).
So then just what is phase?
Quite simply, phase relates to the vibration of sound waves, and how this energy behaves when it is picked up by a microphone and recorded.
Phase typically becomes an issue in two main recording situations:
A) when you are using two or more microphones to record a single instrument (such as drums)
or
B) when you are using two or more microphones to record a whole band performing live in one room.
In this post I’m going to get into some – but not all – of the science behind phase. I’m going to tell you about the important details so that you have a good understanding of phase, without having to re-take physics 101.
I’m also going to tell you about some microphone techniques you can use to make sure phase problems don’t ruin your recordings.
First, let’s get the science out of the way…
While I promise that we won’t get too deep, let’s take a minute to think back to basic physics class. Remember that sound travels in waves.
These waves vibrate at certain frequencies, or cycles per second. To illustrate this I’ll use a simple tone called a sine wave.
This sine wave tone has a frequency of 1000Hz. It’s pitch is almost two complete octaves above Middle C on a musical instrument (it’s just a bit flat of the actual note).
Here’s what it looks like on a graph:
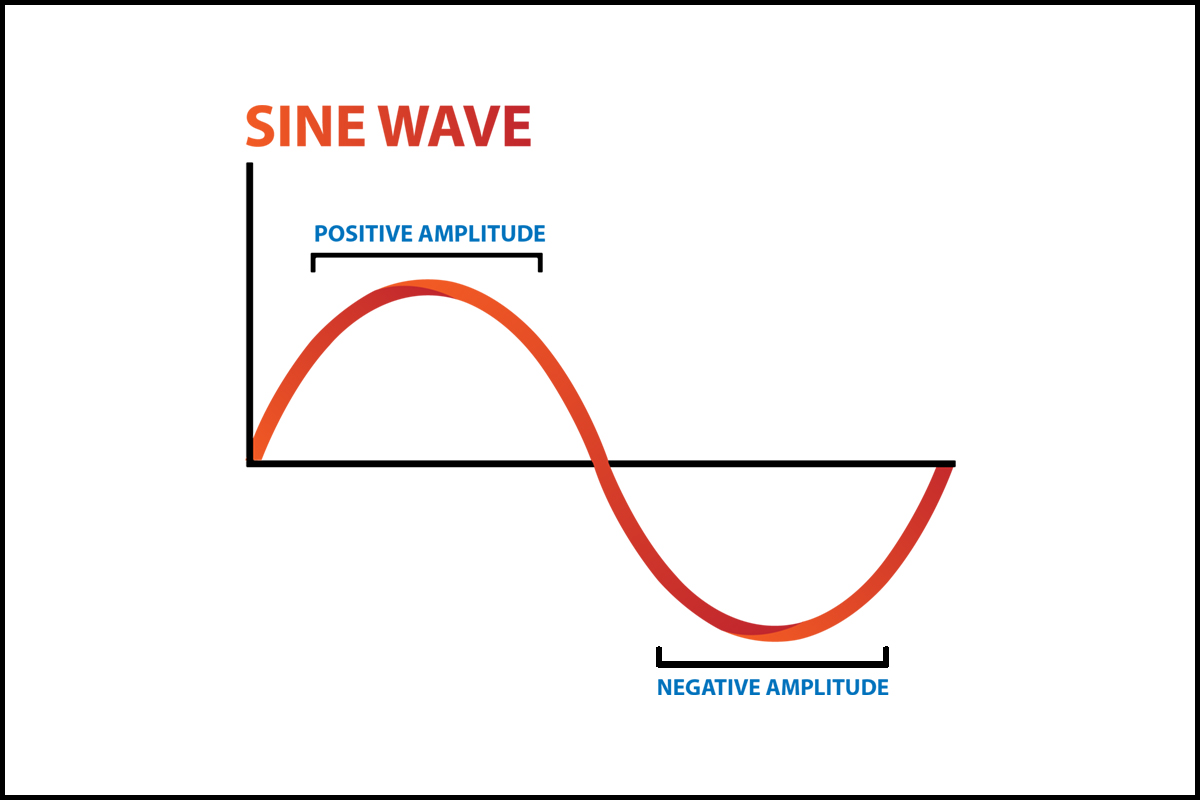
Notice that in the graph, the sine wave only goes from positive energy to negative energy once. This represents one complete cycle, and is only 1/1000th of a second.
Sine waves are great for illustrations such as this one, because they are the most basic form of sound, with no overtones. For this reason they are often used when testing and calibrating recording gear and acoustic spaces.
Now that we’ve revisited the idea of basic sound waves, let’s apply this to a simple recording scenario to illustrate how phase can be a problem.
Imagine that there is a sound source emitting this 1000Hz tone from one end of a room. In front of the sound source there are two microphones set up to record it. One microphone, we’ll call it Mic A, is set up at a distance of 12 inches, and the other mic, we’ll call it Mic B, is set up at a distance of 13 inches.
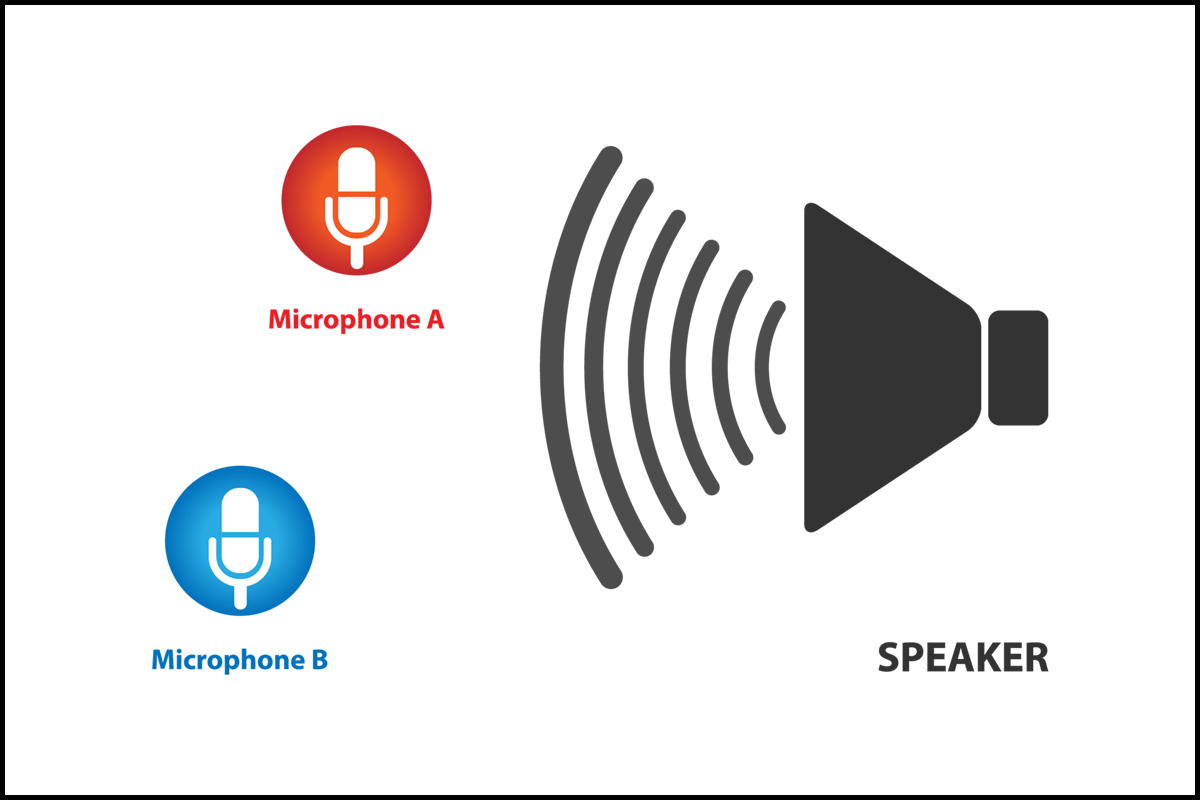
What is going to happen in this instance is that the sound is going to reach Mic A a fraction of a second before it reaches Mic B. This very tiny difference in time is going to result in the microphones recording the signal at two different points, or phases, in the wave’s cycle.
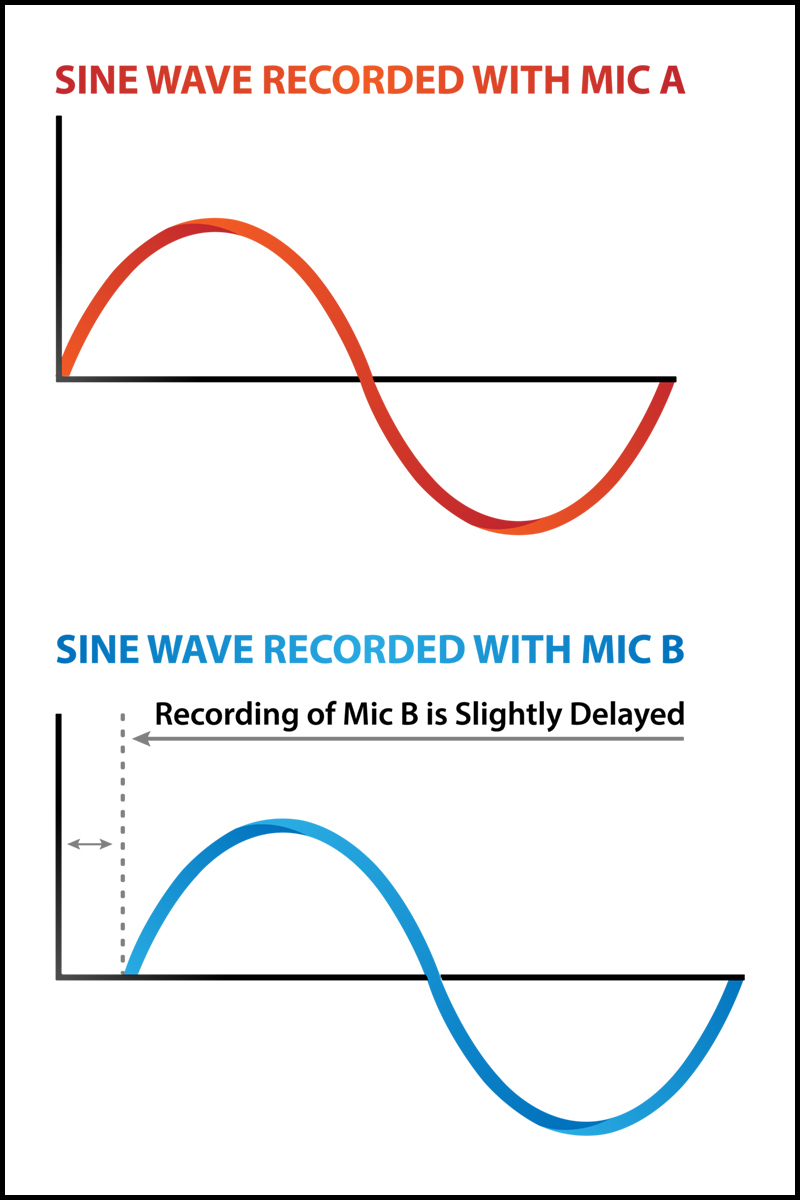
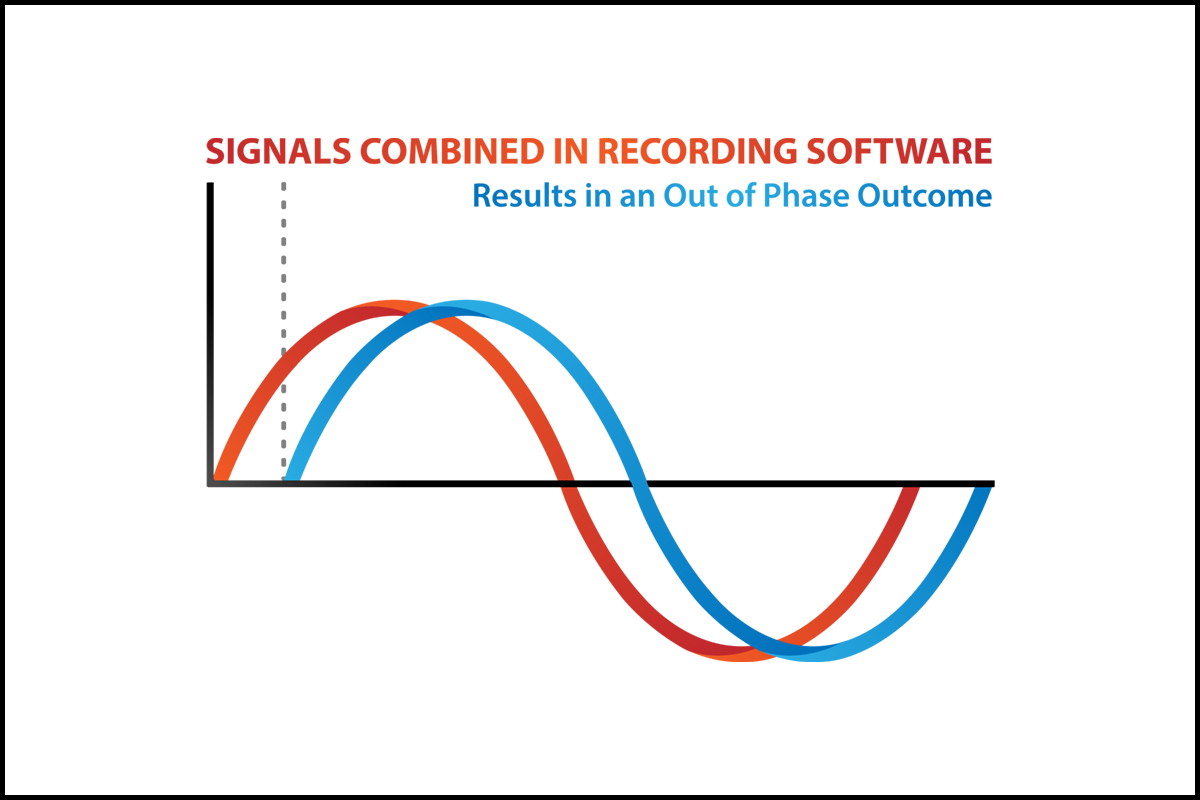
When each signal is listened to on it’s own, it makes no difference. It’s just an annoying 1000Hz tone. However, once these two signals are combined together, by turning up both tracks in your DAW, this timing difference begins to affect the sound of each individual sound wave.
The result of combining these two signals together in your recording software is a signal that is diminished in power. This loss in power (in this scenario involving our sine waves) sounds like a loss in volume.
Each signal listened to on their own, the signal from Mic A or the signal from Mic B, sounds louder than when they are combined together. Weird.
What’s happening is that because the two signals were captured at different points – or phases of the wave – they are negatively affecting one another when they are combined together in your DAW. They are subtracting power from one another, and begin to cancel each other out.
It’s kind of like two magnets turned around so that they are repelling one another.
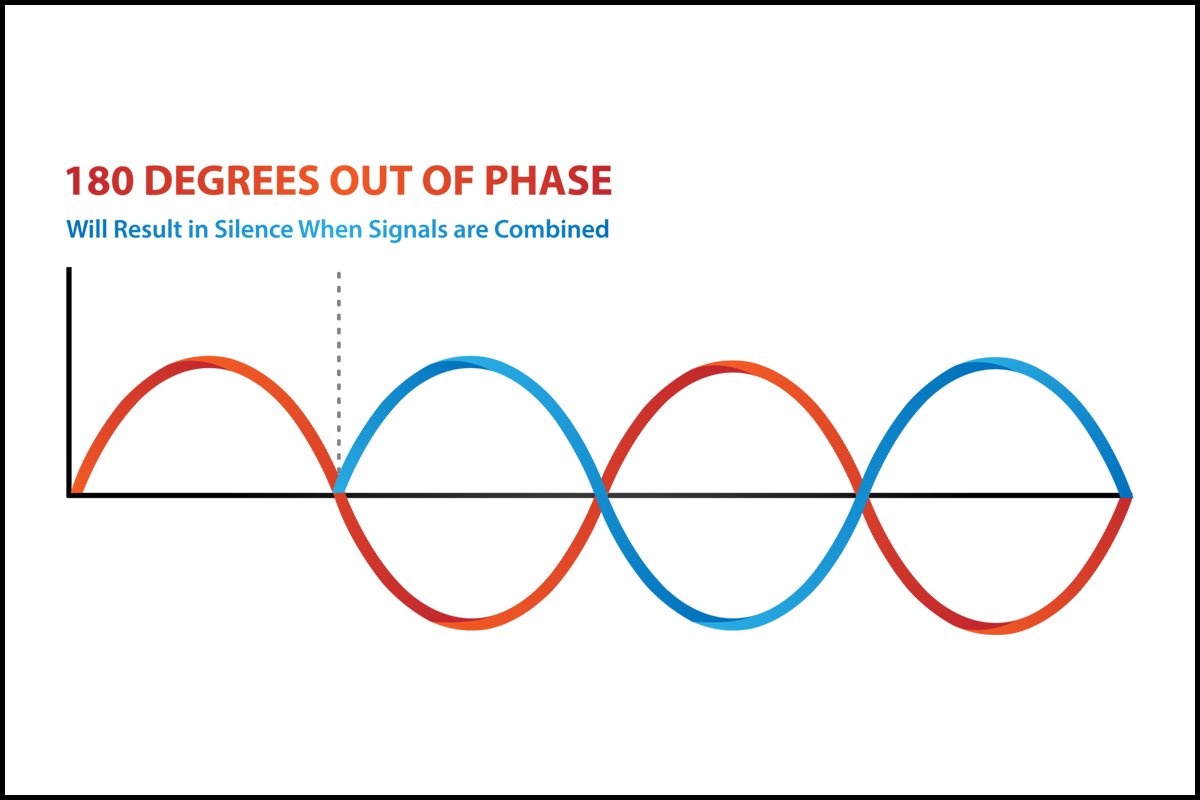
In the most extreme circumstances, the two signals could be so out of phase with one another that they completely cancel each other out, resulting in total silence when the two signals are combined together. This is referred to as 180 degrees out of phase.
So this is all well and good for a basic illustration of what phase is, but in reality you’re not going to be recording simple sine waves.
You’re going to be recording musical instruments that have complex waveforms full of overtones. And these circumstances are a bit trickier.
When dealing with complex waveforms that are out of phase, the result usually isn’t a simple drop in volume, but rather strange comb filtering effects and/or wimpy or thin tones that are partially out of phase.
So what is comb filtering, then?
Because this post is already getting too heavy on the tech-talk, I’m not going to go too in-depth on comb filtering. The glossed over version is that comb filtering is the audible result of having a delayed version of a signal added back to itself.
This issue in essence causes phase problems, which end up altering the frequency response (tone) of what you are recording. It’s similar to sound waves being out of phase, but the cause and effect are a little different.
If you want to get really in-depth on what comb filtering is, just do a Google search, as there are tons of articles written about it. You could also start with this Wikipedia article on the comb filter effect
What’s most important about comb filtering as it relates to our discussion here, is knowing what it sounds like. Here’s an example:
Sometimes comb filtering can actually be a desired effect, and the above audio example might sound familiar to you if you’ve ever played around with a guitar phaser or flanger pedal. Comb filtering is the concept behind how these pedals work.
So how do you wield the power of phase to enhance your recordings?
Now that we’ve hashed out what phase is, and how out of phase signals can ruin your recordings, let’s look at some microphone techniques that can actually take advantage of phase to enhance your recordings.
The easiest and most straight forward mic technique to use to make sure your recordings stay in phase is to simply align the capsules of the mics so that sound is reaching them at the same time, such as when you place two microphones on a guitar amp.
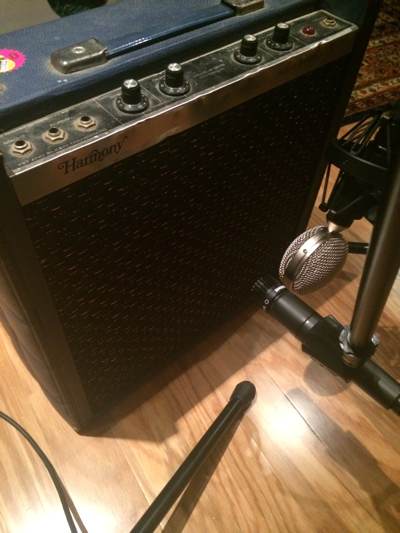
This causes the sound to reach each microphone at the same time, and ends up enhancing and reinforcing the power of each signal, giving the resulting combined tone a more full and powerful sound in your recording software.
Another mic technique that works well is to position the mics with intention to capture the instrument as a stereo recording. When working this way you can utilize the panning functions in your DAW to separate the signal recorded by each mic into each individual speaker.
An example of this technique could be stereo drum overheads.
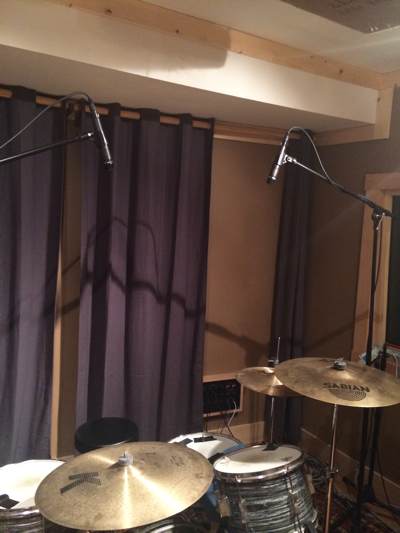
Sure, different parts of the kit will take longer to reach each individual microphone, but when panned, the issues with phase are minimized, and instead our brains pick up on the nuances that clue us into hearing a wider and more detailed sound.
You still want the microphones to be even in height over the kit, but the fact that they are focused over different parts of the kit does not cause as many unwanted issues once they are panned.
The 3:1 Ratio
A final microphone technique I’ll tell you about when working to minimize phase problems in your recordings, is something known as the three-to-one ratio.
This technique mainly applies to situations when you are recording several musicians live, but also kinda why putting multiple mics on a drum kit (when done correctly) enhance the sound of the drums, instead of detracting from it.
The 3:1 Ratio is a rule for positioning microphones so that they are at least three times the distance from each other as they are from their respective sound sources.
For example, let’s say you are recording a guitar player and an organ player at the same time. On the guitar amp, you set up a microphone that is 12 inches away from the speaker. On the organ speaker, you set up another mic that is also 12 inches away from that speaker.
Each of these individual microphones, the mic recording the guitar, and the mic recording the organ, need to be at least 36 inches away from each other to ensure any possible phase issues are minimized.
This 3:1 rule is basically a template to ensure that the bleed from each instrument is minimized and covered up by the direct sound. So while there will technically be phase interference, it will be at such a low volume that you won’t be able to hear it in the final recording.
This is similar to why you can put multiple mics on a drum kit – one close mic on the kick drum, and another as the overhead, for example – and the result will still be a punchy, full drum sound.
The overhead microphone is far enough away from the kick drum, as well as the kick drum mic, that any phase problems are covered up by the much louder direct sounds picked up by each microphone.
Summary
This post was quite long with the tech-blather. Phase can be one of the more complicated recording concepts to wrap your mind around, and (as I just learned) a hard topic to write about. If you initially don’t quite understand the full depth of everything discussed, it doesn’t mean that all your recordings are going to turn out sounding bad.
You do not need to fully understand the concept of phase and/or comb filtering to make and record great sounding music.
The most important thing is that you regularly pay attention to how things sound as you record, and are always evaluating the quality of your recordings.
Knowledge of phase and rules such as the 3:1 Ratio, are simply methods to help give some general guidelines to recording so that some of the guesswork is taken out of the trial-and-error process. These rules are not the “be all, end all” that make or break your recordings.
Many times, forgetting about the rules is the way to liberate your creativity and ultimately make great recordings (think about how they came up with that flanger effect).
Take all of these ideas in stride and trust your ears, using them as your guide. Always follow your creativity first, only using knowledge of the technical aspects of recording as a means to further harness your creative agility in the studio.
In other words, don’t let your lack of complete understanding of any particular recording technique keep you from doing the truly important work of creating.
Just do the work and keep creating…
//Jon
(And thanks for sticking with me on this longer and unusually technical post)
thanks jon!